Changes since the last go-round
I toned down the quantity of water in my recommended recipe. I think you'll find it easier to handle a little dryer dough. 80% is a little steep if you aren't using whole grains - which absorb more water.
I think if you hit this recipe one more time, we'll be ready to tackle a sponge method. After that, whole grains. That should last you until you get a wild hair to try sourdough. Which is excellent, but it's a commitment.
The only other change is a clarification about shaping technique, with a little guidance to help you avoid the dough sticking to your work surface and knife. It's in italics....
Bread is.
Hi Elizabeth.
You asked me for a bread recipe.
This is difficult.
Bread is a discipline, not a recipe.
With that said, I am going to do my best to give you a gateway drug. I will give it to you in baker's percentages, and in grams. I will not give it to you in cups - measuring flour by volume is barbaric.
First, some context. I know, I know, you just want the recipe. But bread is patience itself, so bear with me for a minute.
This recipe and method is intended to improve on and replace the ubiquitous (and good!) easy no-knead recipes floating around - Jim Lahey's is among the best and simplest. Its guiding principles are based on the astonishing ease that Jeff Hertzberg and Zoe Francois introduced to the home baker in Artisan Bread in Five Minutes a Day (my gateway to baking bread): the pleasing idea that you can make a lot of bread dough, stick it in the fridge, and bake it when you want it. It also builds on what I learned from Anis Bouabsa's radical baguette recipe, as published by Peter Reinhart in The Bread Bakers Apprentice - though I think I've eliminated some wasted moves (I favor a long autolyse at room temperature over a delayed fermentation in the fridge, a higher hydration, and different dough handling...)
Once you've mastered this, we can move on to different ways of getting more flavor out of your dough - like using a sponge, or tackling sourdough. There's a lot of bullshit out there about sourdough mystique. You don't have to treat it like fairy-magic to feel a deep connection to the thousands of years of breadbaking history that you're following, and you don't have to even do that to appreciate the immensely superior flavor. And anyway if you're going to the trouble of learning how to handle dough and manage fermentation, the second step is way easier than the first was.
I digress.
The best single book on fundamental techniques of bread baking, full stop, is Ken Forkish's Flour Water Salt Yeast. You should buy it when you're ready to move past this recipe. It's simple, it's thorough, it's deep. It has a monomaniacal focus is on lean dough: that is, breads made using only those four ingredients. It is painstakingly thorough about technique, equipment, and process. If you want to get more serious about bread than baking once in a while, that is the best single book you can read. Use it for at least 6 months before you think about a new bread book.
Okay. The recipe. I advise you read it all through a few times before you get cracking. Watch the videos sprinkled throughout; they're good.
formula:
100 Flour
75 Water
2 Salt
.02 yeast
One day I'll put together a guide for baker's math. Googling it is bewildering. Once you master it, all the doors to every kind of bread crack wide open.
Until then: know that it's all about flexibility. It allows you to manipulate the fundamental essence of a bread recipe, not its expression. We call these bakers percentages, but that's misleading. Think of it as "parts". This recipe is 100 parts flour, 75 parts water, 2 parts salt, and .02 parts yeast.
weight:
1,000 g flour
750 g water
20 g salt
2 g yeast
I recommend you start with white flour. King Arthur All Purpose is good. Don't buy bread flour. It's made for a different technique and time-scale than this recipe calls for.
When you get good at this, you can slowly start adding other grains - whole wheat and rye are the easiest to start with. Spelt is also great. Stuff like oats, corn, buckwheat, and other things might be beyond you until you outgrow this recipe. Start by substituting 100 grams non-white-flour per 1,000. Inch it up as you get more confident, if you want to.
aM
SCALE & Autolyse
Scale out 1,000 g flour into the big bowl.
Slowly add 750 g water to it.
Mix by hand, with a wooden spoon, or, best, a dough whisk.
Scale out salt into small bowl. Set aside.
Scale out yeast into small bowl. Set aside.
Cover loosely and let rest until evening.
This is called the Autolyse. It's fascinating, and all kinds of amazing things are happening to the starches, sugars, proteins, and enzymes during this critical period. An unusually long autolyse is what defines all of my breads.
Mise en Place:
Gather your tools:
- a big bowl
- two little bowls
- flour
- a biggish pitcher of water (room temperature)
- salt (sea salt is best, but anything not too coarse is fine)
- yeast
- kitchen scale (5kg or even 10kg capacity is nice to have. Don't get anything that isn't accurate to 1g.)
- bench scraper
- dough whisk, if you want it.
- flexible dough scraper, if you want it.
For later...
- a banneton
- a 5 quart (ish) dutch oven
- dusting flour (1/2 rice flour and 1/2 white is best, but any will do)
pm
GLUTEN DEVELOPMENT
Every 20-30 minutes after that, return to your bowl and repeat the folding process. 3 or 4 times is great. 5 is overkill. The basic game is to let the dough relax and then hit it again.
Here is Ken Forkish folding dough. It's not any more complicated than it seems. Grab, stretch gently, press gently. Rotate and repeat. Flip it over.
You're developing the gluten strength of the dough, preparing it to trap the gas emitted by the yeast.
Your flexible dough scraper is good for making sure you don't end up with huge amounts of dough getting crusty on the sides of the bowl.
Cover loosely and let rest til morning.
mix & ferment
In the evening (about two hours before you go to bed, or more), add the yeast to the dough.
Mix it in thoroughly, by pinching through the dough like a lobster would, rotating the bowl. Then rotate the bowl the other way, pinching crosswise through your first pinches. I do about 16 total.
Now, grab one piece of the wet mass and fold it over. Rotate and repeat until you've loosely folded the wet, shaggy mass all over. I do about 5 folds. Next, repeat the process with the salt.
I'm assuming here that your kitchen is a livable temperature. If it's very cold or hot in your kitchen, your time scales will elongate or contract, respectively. Because yeast breeds faster when it's warmer.
am
Shaping
Now you're going to shape your loaf.
At this point your dough ball should have round edges, not sloping edges, but it will have flattened out somewhat into a mounded disc.
If the top of your dough is sticky, dust it with a little dusting flour. You want it mostly dry but a little tacky.
Flip the dough, dry side down, wet side up, onto the dry section of your work surface. Think of your circular dough now as a square. Take hold of two corners of it and fold that edge over just past the middle, pressing down just enough to make the wet dough stick to itself. Repeat with the three other sides, until you have a little roundish cubish thing. Flip it over, smooth side up. Repeat the gentle scraping and rotating you did in the last step.
Pro Tip:
**To prevent your dough sticking to your bench knife, dust around the edges of the round ball of dough. The knife will scrape it under the dough as you go. Feel the tension of the dough. A light hand on top of the dough can help make sure that the dough has the right tack on your work surface. If the skin of your dough starts to rip, stop. You went too far. **
Here is a video of a confident man with no head shaping a loaf. His technique is good, but I part ways with him at 0:45. I don't do the edge-pinching thing that makes it look like an alien spider baby. Instead I do the bench-scraper rounding thing. But the spider baby is what they do at Tartine, which is arguably the best bakery in the country, so... try it if you want. It's a little harder to master.
Put some dusting flour in your banneton. Nice even coat.
If you bake regularly, it is well worth having a container of dedicated dusting flour which is 1/2 white flour and 1/2 rice flour. Put some dusting flour around the edges of your loaf on the bench. Use the bench scraper to work it under. Lift the loaf and set it in the basket, smooth side up, sloppy side down.
Cover it a little less loosely. A plastic lettuce bag works very well.
dividing
Now you're going to cut off a hunk of dough to make into a loaf.
Your dough should be risen significantly, a little shiny, and may have some subtle bubbles under the skin of the dough. It'll smell a little sweet.
Tip the dough on to the unfloured counter. Dust the top with a little flour. Your flexible dough scraper is good for clearing out your bowl.
Cut off a hunk of dough with your bench knife. This is your loaf. Make it about half the size of the loaf you want. A large grapefruit size is a good place to start. Put the rest back in the big bowl and refrigerate it. (We'll circle back to this dough.)
Scrape along the bottom of your dough hunk to loosely organize it into a ball, rotating, scraping, rotating, scraping. Be gentle with the dough. Use a litte flour on your hand to keep it from sticking to you.
Here is a hypnotic video of a man shaping a bunch of dough like this. Watch , learn, be hypnotized. But STOP watching it at 4:55. Because after that, I strongly disagree with his rough handling techniques.
Let the dough rest for 20 minutes, uncovered, preferably on the side of your working surface, not the center. (The bottom of the dough will make it wet, which will complicate your life in the next step.)
If you're making multiple loaves, it's okay if the bleed together a bit. Cut them apart with your bench scraper if they don't pull apart on their own.
am or pm: you choose
baking
Finally.
Put your dutch oven in your oven. Preheat to 500.
When you are ready to bake, uncover your loaf and dust the smooth face-up surface with flour. Dust your work surface with flour. Have your bench knife handy.
Flip your banneton over onto the work surface. If it sticks, gently peel it out with one hand. Either you need to use more dusting flour next time, or you let it proof too long and it got sticky and loose.
Slide the dough into your hands and drop it carefully into your hot hot hot dutch oven, smooth side down, ragged side up. Cover immediately and put back in the oven. Turn down to 475.
I couldn't find a good video of that process. Just be careful and gentle, working quickly. If you want to mist the surface of the dough with water right before covering, that's extra credit.
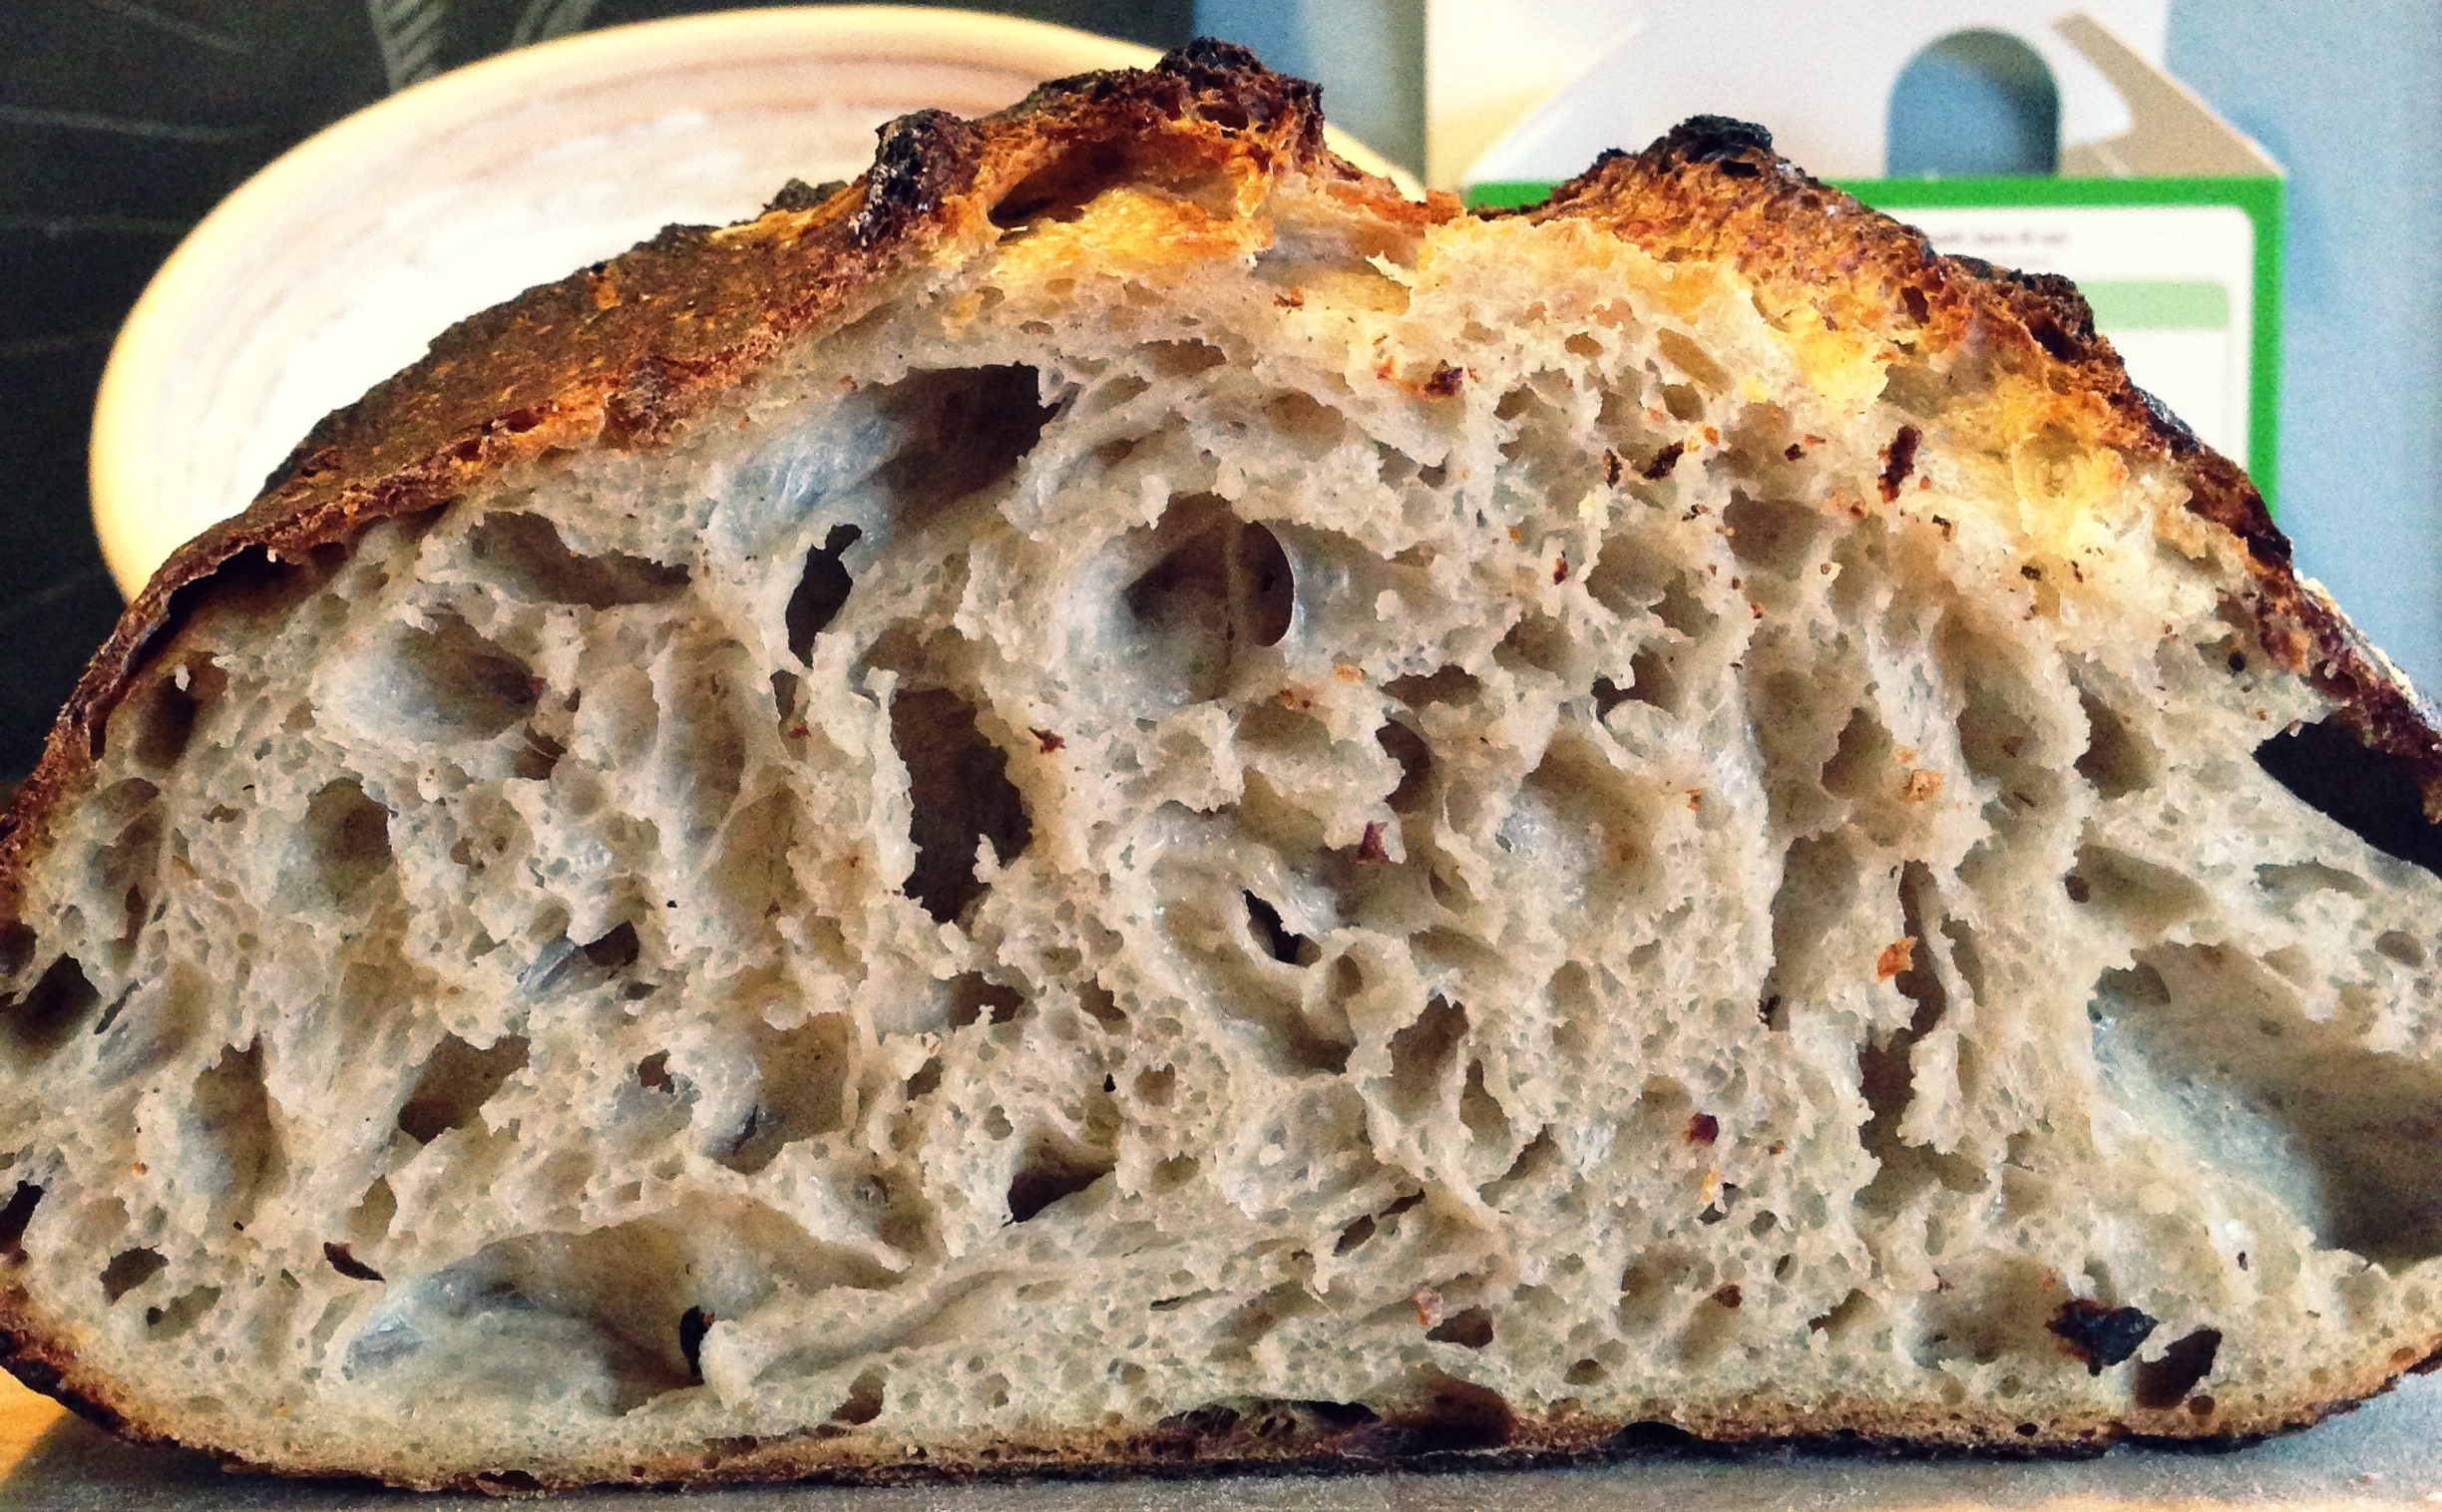
Bake about 20 minutes. Take the cover off. Bake until it's deep red and brown, about 25 more minutes.
You put it ragged side up because that way the loaf splits open along the edges of where you folded the dough. It's a lot easier than trying to score the loaf with a razor blade inside a hot dutch oven. If you don't have a ragged edge or a score, it'll split weirdly along the bottom edge of the loaf.
The covered oven keeps the moisture evaporating out of the dough in the air, which keeps the skin moist and allows it to expand, giving you better rise and better crust texture. If you don't use a dutch oven, there's all sorts of crazy shit you gotta learn about putting steam in your oven. Good luck googling that - I prefer the boiling-water-over-lava-rock technique.
Proofing
Your loaf is now doing all its own work. This is called the proof.
You can do two things now. Bake it in an hour, or put it in the fridge and bake it later.
For the one-hour timeline, set it on top of the oven. Wait a half an hour and then preheat your oven, leaving it right where it is.
For the many-hours timeline, stick it in the fridge. It'll be good in there for about 12 hours. After that it starts to get wet, sticky, and not good for baking.
Either way, you want the dough, at the end of its proof, to spring back slowly and incompletely when you push your finger one knuckle-depth into the dough.
Dough relaxes as it rises. So: too early and it'll rise unevenly and not have great flavor. Too late and it'll collapse into a wet brick of dough.
Here is a video of a finger ominously poking dough. That dough looks good to me. If you are in doubt, err on the side of too springy.
old dough
The dough that is in your fridge will keep for a week. Pull it out and you're back at the dividing and shaping stage. Only your dough is cold, so it will need a little longer in each stage.
The dough gets better every day for about 4 days, then it starts to decline.
EATING
The interior of the loaf is still cooking for a surprisingly long time after it comes out. Let it cool on a rack or tipped on its side at least until it's just warm to the touch before slicing, about an hour.
Enjoy.